I got my first nail stamping kit immediately after the first time I saw a nail stamping video. I think I watched the whole thing with my jaw dropped like a cartoon. I had no background in nail art, and I have very clumsy hands–if I can do it, you can do it.
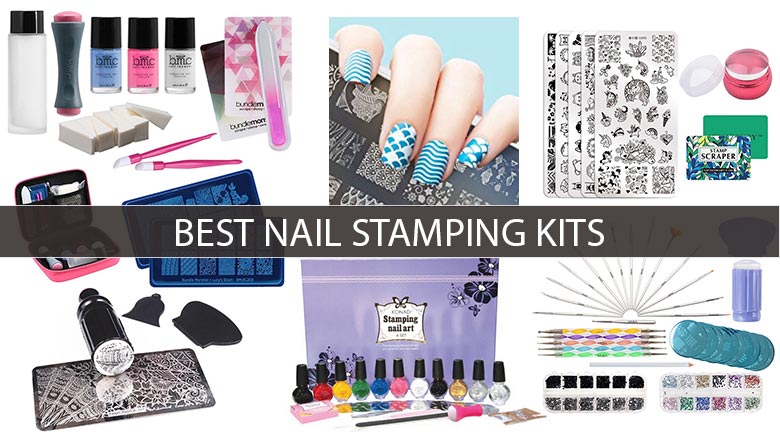
These kits have a range of sizes depending on if you want nail stamping polish to be included or not. See the end of the article if you’d like to read a quick how-to and troubleshooting tips, but now let’s get to looking at the best nail stamping kits that get you started on this fun nail art.
|
Amazon Customer Reviews
|
Price: $14.99 Shop at Amazon | Shop now Read our review |
|
Amazon Customer Reviews
|
Price: $85.00 Shop at Amazon | Shop now Read our review |
|
Amazon Customer Reviews
|
Price: $13.99 Shop at Amazon | Shop now Read our review |
|
Amazon Customer Reviews
|
Price: $5.99 Shop at Amazon | Shop now Read our review |
|
Amazon Customer Reviews
|
Price: $14.99 Shop at Amazon | Shop now Read our review |
|
Amazon Customer Reviews
|
Price: $15.99 Shop at Amazon | Shop now Read our review |
|
Amazon Customer Reviews
|
Price: $14.99 Shop at Amazon | Shop now Read our review |
|
Amazon Customer Reviews
|
Price: $8.99 Shop at Amazon | Shop now Read our review |
|
Amazon Customer Reviews
|
Price: $22.99 Shop at Amazon | Shop now Read our review |
-
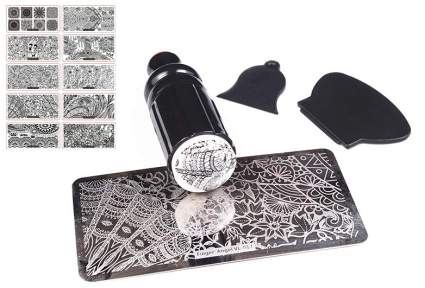
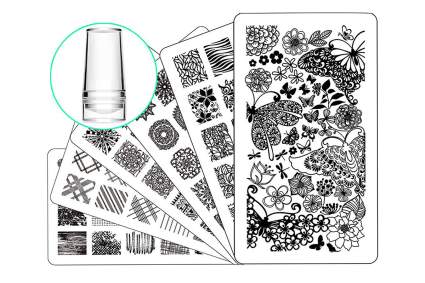
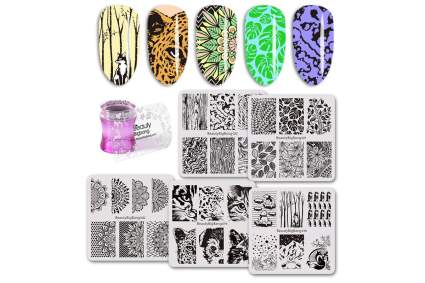
1. Finger Angel 10 Stamping Plate Set With Marshmallow Stamper
 Pros:
Pros:- Great value
- 10 large stamping plates
- Easy to use marshmallow stamper
Cons:- Not much variety in stamping designs
- Images are not as dense and full as other plates
- Only comes with hard plastic scraper
If you’re on a tighter budget and plan to make do with regular polish, this plate and stamper set from Finger Angel will give you everything you need except for the polish.
The plates are mainly floral themes with some lovely dandelion puff images and floral mandalas. They’re decently etched and function well though images that have large areas of polish to be stamped are more likely to have little gaps or lines compared to stamping plates in a higher price bracket, particularly with non-stamping polish.
The marshmallow stamper is perfect for beginners and gives you a couple of different sizes to choose from.
Find more Finger Angel 10 Stamping Plate Set With Marshmallow Stamper information and reviews here.
-
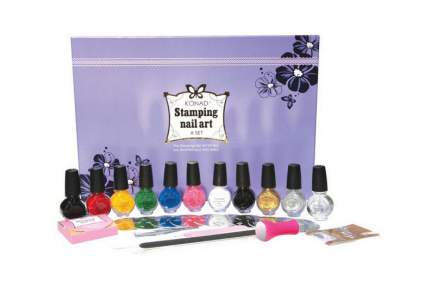
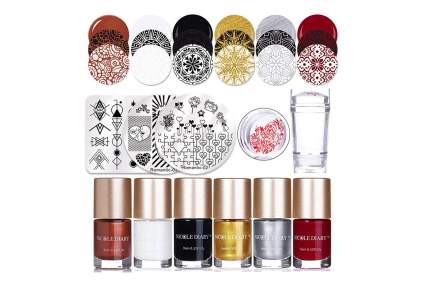
2. Konad Stamping Nail Art A Set
Pros:- Everything you need to get started
- Includes full-size stamping polish
- Comes with top coat
- 10 different plates
- Other nail art accessories
Cons:- Bigger investment up front
- Polishes not as vibrant over black
- Images on plates are simple
Konad is on the more professional end of the nail art spectrum and is a favorite among many nail stampers. The A Set is packaged neatly in a large purple gift box with a slot for every piece included to ensure everything makes it to you safely.
It comes with 10 full size (11 milliliter) stamping polishes, a top coat, 10 nail stamping plates, stamper, a plastic scraper, a steel blade scraper, tweezers, a packet of 50 rhinestones, and nail files and buffers.
This set has an awesome array of colors in your stamping polishes including metallic gold and silver. Konad stamping polishes are creamy and on the thinner side. They produce a clear image but I would say that some of their colors don’t show up as boldly over very dark colors as other brands.
I like that it includes a top coat as finding a top coat that won’t smudge your art is half the battle. The stamper picks up well and the two different types of scrapers lets you play around with what you like best. Metal edge scrapers may create a crisper image for some people, but in my opinion it’s not worth risking scratching your plates.
The 10 plates are all in the circular Konad style. Konad tends to have more individual images rather than full coverage designs so keep that in mind when picking. For the price this comes out to under $4 per item and with full-size polishes, that’s not bad at all. This is a good choice if you’re looking for a gift to get someone started in nail stamping.
Find more Stamping Nail Art A Set by Konad information and reviews here.
-
3. Vaga Nail Art Starter Kit
Pros:- Huge variety for the price
- Includes plates, stamper, and scraper
- Lots of other nail art tools
- Affordable
Cons:- Not high quality
- No polish included
- Scraper is hard plastic
This kit by Vaga is perfect if you’re completely new to nail art, want to play around to see what interests you, but don’t want to blow a lot of money while you’re still experimenting. You get a huge amount of stuff in this kit.
It comes with 10 circular nail stamping plates, one clear stamper, one hard plastic scraper, 15 nail art brushes, five double-ended nail dotting tools, one tin of 1500 black and silver rhinestones, one tin of 1500 multi-color rhinestones, and one gem stone placer.
The stamping plates are fine–nothing extremely impressive design-wise and the etching isn’t super deep but they’ll stamp. I like that the stamper is clear though it’s a little firm compared to other jelly stampers.
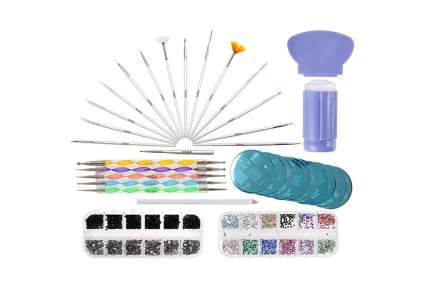
I have these same dotting tools and use them all the time. This brush set comes with all the different shapes you need from a wide fan brush to thin, long striping brushes.
That rounds out to around $0.39 per piece if I count the thousands of gemstones as only two items. For this kind of value, you can’t expect the best quality, but as a starter kit or a gift for a young teen, the sheer variety for the money makes this a great choice.
Find more Vaga Nail Art Starter Kit information and reviews here.
-
4. Ejiubas Stamping Plates & Stamper Set
Pros:- Includes plates, stamper, and scraper
- Range of themes
- Space saving plates
Cons:- Double-sided plates can be a hassle
- Stamper is transparent
- Stamper quality is not as good as others
The main issue for me with my stamping tools is that they take up a fair bit of space and the metal stamping plates are heavy, especially when you’ve got a bunch of them in one storage space. Ejiubas seeks to bring both those down by etching on both sides of their metal plates.
This starter set has a stamper, scraper, and three metal plates with six stamping surfaces. Each plate has its own theme reflected on both sides: floral, textures, and mandalas. The downside to double-sided plates is that it’s a little messier if you want to use both sides of the plate in one manicure and you have to be a little more careful when storing since both sides are vulnerable to scratches.
They pick up well with crisp lines. For images that have large sections of polish to be filled in, this brand benefits from scraping once to one side and then again from a different angle to avoid gaps in the pigment.
The scraper is a thin plastic one with good flex and the stamper it comes with is see-through.
Find more Ejiubas Stamping Plates & Stamper Set information and reviews here.
-
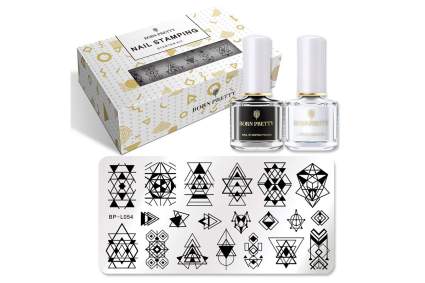
5. Born Pretty Stamping Kit With Stamping Polish
Pros:- Everything you need to get started
- Incredible value
- Includes stamping polishes
- Clear jelly stamper
- Comes with stamping polish
- Trusted brand
Cons:- Only one plate
- Stamping polishes are only 6 milliliters
- Limited polish colors included
This nail stamping starter kit from Born Pretty comes with everything you need to get started at a great price point. Born Pretty is one of the more popular brands and I’ve bought myself a few of their plates and always been happy with the way that they stamp, even with drugstore polish.
This kit comes with one stamping plate, one clear jelly stamper, a plastic scraper, and two bottles of nail stamping polish in white and black. They’re smaller than normal size polish but you only need a very small amount when stamping because the polish is thick and highly pigmented. I have these colors from their 25 Color Stamping Polish Set (bought with my own money) and they stamp beautifully.
The stamper is a clear jelly stamper perfect for being able to precisely place your designs. I have a different jelly stamper from Born Pretty and use it all the time. It comes with a thin plastic style scraper which is easy to work with.
Find more Born Pretty All Included Stamping Kit information and reviews here.
-
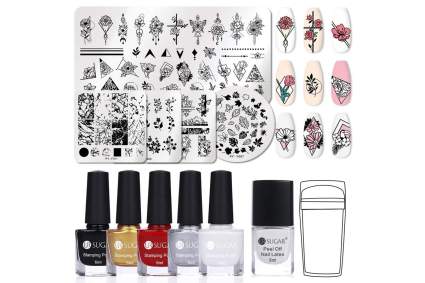
6. All Included Ur Sugar Nail Kit
Pros:- Clear stamper
- Metallic stamping polishes
- Five stamping plates
- Liquid latex nail barrier
Cons:- Plates not as well-etched as more expensive brands
- Stamper isn't double-ended
- The images on the round plates may be too big for some nails
This All-Included Ur Sugar Set is a great one on a budget and while it’s not from a well-known brand it does come with everything you’ll need to get started.
With this kit, you get one rectangular stamping plate, three square plates, one round plate, one clear jelly stamper, one plastic scraper, one bottle of liquid latex nail barrier, and five stamping polishes in black, white, red, gold, and silver.
I love that it comes with liquid latex for nails because it makes cleaning up after stamping a million times easier and faster. There’s a decent variety in the stamping plates from florals to fall leaves to marble patterns.
Find more All Included Ur Sugar Nail Kit information and reviews here.
-
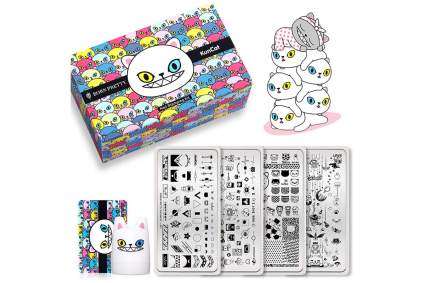
7. Born Pretty KunCat 4 Plate Nail Art Stamping Set
Pros:- Includes plates, stamper, and scraper
- Cute KunCat design
- Marshmallow stamper
- Trusted brand
Cons:- No stamping polish
- Slow shipping
- Stamper isn't clear
If you’re all about cute things, check out Born Pretty’s KunCat Set. This stamping set comes with four nail stamping plates, cat-shaped marshmallow stamper, and a thin plastic scraper.
The extra-large plates have a nice range of adorable KunCat designs. After I got over my initial nail stamper beginner’s struggle, I’ve had great luck with my Born Pretty clear stamper and always have perfect results with my other Born Pretty plates when using stamping polish.
Find more Born Pretty 4 Plate Nail Art Stamping Set information and reviews here.
-
8. Beauty Big Bang Stamping Kit
Pros:- Everything but the stamping polish
- Five stainless steel plates
- Well-etched
- See-through stamper and scraper
Cons:- No stamping polish
- Stamper not as easy to learn on as a sticky one
- Should really use stamping polish with these
If you don’t need your kit to include stamping polish, this Beauty Big Bang Set is a good choice on a budget. It includes five full-size rectangular stamping plates, a flexible plastic scraper, and see-through jelly stamper.
The plates are decently-etched and are a nice mix of florals, wood grain, and some more advanced images of animals so you can experiment with reverse stamping. It’s a good stamper but might take a few more tries for beginners to get the hang of than kits that contain a sticky stamper.
Find more Beauty Big Bang Stamping Kit information and reviews here.
-
9. Nicole Diary Stamping Set
Pros:- Includes polish, plates, stamper, and scrapers
- Clear stamper
- Painfully cute plate designs
- Theme options
- Metallic polishes
Cons:- Image quality not as great as other brands
- Polishes are all sort of similar
- Plates images aren't super interesting
This kit comes with six full-size nail stamping polishes, a dual-ended clear jelly stamper, two thin plastic scrapers, and three circular stamping plates.
Stamping polish always makes such a difference so I love that this comes with six colors, including black and white. The stamper is transparent so it’s easy see through and line up your images.
The plates have a more shallow etching than some other plates but still deliver great images, particularly with stamping polish as you can see in this stamping swatch video on YouTube.
As far as designs it comes with hearts and geometric shapes to go with the metallic polishes. Nicole Diary also offers this kit in reds and hearts.
Find more Stamping Polish Set With Mini Stamper by Nicole Diary information and reviews here.
How hard is nail stamping?
I can only speak to my experience and say that there's a learning curve. Don't expect to get it right your first try. That's okay. That's normal. When I started out, I wasn't using quite the right materials or methods and had a hard time with it.
I struggled. I considered giving up. I couldn't get images to pick up on my stamper and it was frustrating--but that's why I'm writing this so that you can avoid the mistakes I made and get to the fun part faster.
Start out planning to stamp onto paper just to try it out. If you get frustrated, put it away and try another day. Stick with it and soon you'll fall into the groove and amaze yourself.
What do I need?
Okay, bare bones to buy if you're new to nail stamping: a stamping plate, a scraper, and a stamper. Your stamping plates provide the images, scrapers remove the excess polish, and a stamper transfers your stamp. If you've got these three things, you can start playing around.
That said, there are a few products that will make your life, and nail stamping, much easier. The biggest question is do you need special stamping polish? The answer is a tentative no.
I started out using my regular polish and there are lots of drugstore polishes that will stamp well--but there are also lots that won't stamp well. You have to experiment with your polishes to find out which work for stamping. A good polish for stamping is generally opaque in one coat.
I was resistant to add stamping specific polish to my overflowing collection but I have to admit that once I tried them I won't ever go back. They are more than worth the money.
My stamping polishes stamp clear every time. They show up well overall colors, even white over black. If you can swing it, and there are cheap options, it's made my whole stamping process faster, more fun, and more professional looking.
See my guide to Stamping Nail Polish for more info.
-
A quick how to:
You've got all your stamping materials, you've picked out the design you want to stamp, and you're ready to go. What's first?
1. Lay everything out in easy reach on a protected surface.
2. Apply your polish to the top half of the chosen image on your plate. There's no need to cover the entire etching and it's a waste of polish.
3. Hold your scraper at about a 45 degree angle and swipe it downward to distribute and remove the excess polish. I find it handy to have a paper towel next to my plate to wipe my scraper off right way.
You'll want to experiment with how much pressure to apply and how fast you go. I tend to go pretty light and fast because pressing down hard can remove too much polish.
If you've swiped and you can't see the image, you can wipe again, but this time do it the side. Going from a different angle helps distribute the polish into all corners of the design and prevents you from over-wiping the image. Your plate won't be completely free of excess polish but that's okay.
4. Grab your stamper. This is the part that really needs some experimenting because you'll have to find the technique that works for you and your materials.
Depending on your stamper, you want to either lightly roll the stamper over your design or lightly press down and then either lift up or roll the stamp up. This takes some practice to learn what's the right pressure and angle.
Your instinct will be to press down really hard like you would on an ink pad. Resist this urge. That's the number one reason you're not picking up your design. Go lightly. Start by barely touching the plate and increase your pressure from there until you find what works.
5. Apply it to your nails. Congrats! That's the fun part. Clean up around your cuticles and admire your work.
The cleanup.
You'll need to clean the polish off your plate between every stamp to get a clear image. You can do this with any lint-free pads and nail polish remover. I use non-acetone on makeup wedges because acetone-leaves a white cast on my plates that just annoys me but you can use either.
To clean your stamper, press it onto a clean lint roller and you're good to go. Avoid using nail polish remover on your stamper because it can damage the surface. When you're storing your plates, never store them so that the metal sides are rubbing against each other because that can cause scratches.
Different stamper heads.
There are three main types of stampers: rubber, marshmallow, and clear jelly and which is right for you comes down to personal preference. I'm not a fan of rubber stampers which are firmer but some people love them.
Marshmallow stampers are squishy and sticky and pick up images like a breeze. I wish I had started with one of these. I use these for stamps I'm not worried about centering.
My favorite is my clear jelly stamper. It's see-through which means I can see exactly where I'm placing my stamp on my nail and it really helps with checking my images in reverse stamping.
It's not working!
Don't panic. We can get you there.
Problem: The polish isn't picking up at all or the plate won't hold the polish.
The first super common mistake is not removing the protective film on your plate. Is your plate blue? If so, it still has the protective plastic coating on it. Peel off the blue plastic and your plate should be a metallic silver. Some brands use a clear protective coat, so check for this issue first.
If that not the issue, switch up your stamping motions and pressure. Try rolling, try dabbing, or very light pressure.
Next try a different scraper. I love the ones that look like a gift card (in fact you can use an old gift card if need be) and hate the hard plastic ones, but that's me.
If that's not helping, try a different polish and make sure you're working with quality plates. My article on Best Stamping Plates outlines the top brands.
Problem: The image is spotty or flaking instead of sticking.
You may be working too slow. When you apply your polish, scrape, and then wait a bit, the polish will start to dry on your plate. You want to get it on your stamper as fast as possible.
Still not working? Adjust your scraping pressure or try swiping up and then to the side to fill the etching. If you've done all the above, spring for stamping polish. It also could be that your plate isn't etched deep enough. Cheap plates don't always deliver crisp images so stick with trusted brands.
Problem: It's stamping but it's barely showing up.
You may need stamping polish to get the right opacity if your regular lacquers are too sheer. Or the colors just might not stand out well on your base color.
My trick is to stamp my image onto a piece of clear plastic like a cut up baggie first and then hold it over swatches of my polish to see what colors it pops over and which make it show up dull. Yes, I'm a nerd, but an efficient nerd.
Problem: It stamped perfectly but my top coat smudged it and ruined the image!
I have so been there. You should give your nail art a while to dry before applying your top coat for best results but honestly, I'm impatient and only wait until I've finished the rest of my hand.
The real culprit is the top coat and your application of it. Not all top coats work well with stamping as they can dissolve a bit of your previous color and smear it all together. There are top coats that won't do this to you.
I'll be writing an article on the best top coats for nail stamping, but for now you can check out my guide to Nail Polish Top Coats and go for a top coat that says it's quick-drying.
My other advice is to float your brush. When you apply your top coat, barely scrape off the brush and let a good size bead come to the bottom of your brush. Gently settle that onto your nail.
Your job now is to manipulate that bead of top coat all around your nail without actually touching the bristles of your brush to your nail surface. It wasn't easy for me at first since I'm really clumsy, but it's doable. Don't worry about applying too thick of a top coat--thick is good here.
Okay, that's enough of that. If you have other questions check out Nail Art 101 Troubleshooting Stamping Problems on Lazy Betty.