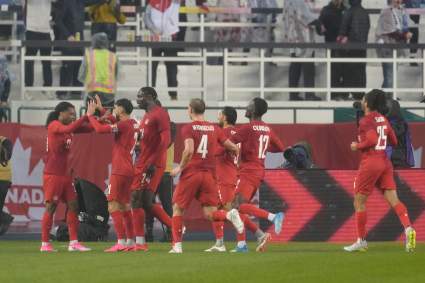
Monster Hunter World Witcher Quest Walkthrough

monster hunter world witcher

Capcom

A free title update gave Monster Hunter World players a chance to play as Geralt of Rivia from The Witcher series.

The Monster Hunter World Witcher quest is fairly straightforward, but there are some difficulties along the way that you should prepare for. Here’s our in-depth walkthrough on how to complete the quest.


Where to Find the Witcher Quest

First, update you game to the 6.0 version. Then once you get to Astera, talk to the Third Fleet Felyne. They’ll be right next to where you spawn and have a blue exclamation point over their head. Then just select “yes” to head to the research base.

At the research base, walk down the stairs to right and talk to the Lynian Expert with the blue exclamation point.

You play as Geralt of Rivia. You have a predetermined set of equipment. You can only keep quest reward items from the quest. You won’t keep any items you find in the field, though you can still acquire them to craft items and make Slinger ammo. Meal effects are not applied and lost when departing for the quest. The quest will not count toward the guild card’s weapon usage stats.


The Witcher Quest

You have a bunch of new skills while playing as Geralt. First, you can sense red tracks that point you to. You also have an item in your item bar known as the Igni Sign which sends out a short wave of fire in front of you. After using it, you need to wait before you can use it again.

Fighting operates just like using the Sword & Shield weapons. You have access to the same kinds of attacks and combos, including your advancing slash by pressing Triangle and Circle and the Charged Slash by pressing back on the control stick and holding Circle while in the middle of a combo. You can also guard attacks with R2.

Keep in mind that you’ll only have 50 minutes to talk to everyone and defeat the boss.

Talk to the Smithy Apprentice up ahead. Here, you can change your weapons to any other type of weapon in the game. So if you’re better at using the Great Sword than the Sword & Shield, for instance, you can change to that.

The map will tell you where to meet the other people you need to talk to. Once you get to the Endemic Life Researcher, examine all three parts of the dead Aptonoth and then leave. Head straight forward from the Aptonoth to the right of the trees to find some tracks. Follow them to Zone 1 and walk to the swirl of Revoltures. Go up to the birds and use your Igni Sign by pressing square to scare them away.

Follow the map to the Chief Botanist. You’ll only find a notebook. Follow the tracks that appear to the next journal. Follow the tracks into the cave and examine the tree roots. Follow more tracks and then free the Chief Botanist by burning the roots with your Igni Sign.

After talking to the Endemic Life Researcher and the Chief Botanist, head to zone 12 on the map (it will be closer to your location if you talk to the Chief Botanist last). You’ll be ambushed by a group of Jagras. Defeat them and then destroy the totem by interacting with it with circle.


How to Beat the Leshen

The Leshen is an annoying enemy, but you can defeat it pretty easily if you follow some tips.

The Leshen has claw attacks that not only pack a punch but can cause bleeding. If Geralt starts bleeding, eat an Astera Jerkey to cure it or crouch in one place for a little bit. If the Leshen puts one hand in the ground, it will send out a line of roots to attack you that you can dodge to the side of. If it puts both hands in the ground, it will send out a strong wave of roots around it so be sure to dash out of the way before then. When it surrounds itself with Revoltures, they’ll deal gradual damage over time when you stand next to the Leshen. The Leshen will also send out the birds to attack you if it points forward while surrounded by them, so be sure to dodge out of the way. The Leshen can teleport away. It can also create root walls to block you, though it is exposed from the back.

The Leshen will summon Jagras to attack you, and they won’t run away if you hit them with dung pods. Jagras can be quite annoying because while their attacks don’t deal too much damage, they can leave you vulnerable to attack or prevent you from healing. Be sure to take them out instead of just ignoring them.

The key to this fight is the use of the Igni Sign. The fire blast not only deals big damage but also stuns the Leshen, allowing you to pile on a damaging combo with your weapon. A good combo with Geralt’s Silver Sword is three presses of triangle and then holding down on the control stick and circle at the same time for a charged slash. The fire blast will also destroy the root walls the Leshen summons and also take care of any Jagras caught in the blast. Just be sure to avoid using it before the Leshen teleports out of the way.

The Leshen can also be staggered by the bomb pods it drops. Fire them at the Leshen right before it attacks.

Keep an eye on your sharpness throughout the fight. It can deplete quickly, especially when taking out the Jagras. If you’re dangerously low on sharpness, you can stun the Leshen with the fire blast and then use your whetstone.

The Leshen is highly susceptible to poison. If you manage to fight it in the area with the poison cups, try to make it move into there and then activate the plants to make them poison the Leshen.

Its head is its weak spot and can be broken twice for the Leshen Antlers monster part. It can also be mounted just like any other monster.

You can use the monster parts from the Leshen to forge the Witcher’s Silver Sword and the Geralt Full Armor. The sword has high dragon element attack as well as high elderseal and white sharpness. The armor grants the Super Recovery skill which allows recovery to exceed the red portion of the health meter. It also has excellent skills like Attack Boost level five and Weakness Exploit level three.


Side Quests & Extras

The Witcher quest has multiple side objectives you can complete for different endings. Fortunately, you can repeat the Witcher quest as many times as you want from the “Special Assignments” section of the quest board. Completing all the side objectives in one go will earn you the Guild Card title of “Wild Hunt.”

Users on the Monster Hunter World Subreddit have already begun compiling a list of the side quests available.

The biggest side quest is the Pukei-Pukei in Peril quest. Next to the Chief Botanist is three Pukei-Pukei. One of them is actually alive. Free it with the Sign and it will help you against the fight with the Leshen during the final phase. In order to complete the side quest, you have to keep the Pukei-Pukei alive while killing the Leshen. Be sure to use the Lifepowders in your tool bar to top off the Pukei-Pukei’s health and stagger the Leshen’s attacks with bomb pods.

Another side quest is the Gajalaka Chief quest. Start the quest by examining the Gajalaka markings near the camp at zone 11. Talk to the Felyne Researcher marked by the exclamation point on the map. Fast travel to the camp at zone 17 and head to the Rathalos nest at the top of the map. Defeat all the Gajalakas there. When prompted, agree to become their chief. Go to zone 13 to meet the other chief. Your medallion will react when you’re near. StalkerBasher on the Subreddit said that the chief is near where Deviljhos like to sleep and where the giant vigorwasp is. The Felyne Researcher will then talk to you and the quest will be complete.

Completing the main quest once will give you a Critical Bounty where you have to find and capture a Nekker. This is separate from the side quests in the Witcher quest. According to the Monster Field Guide, the Nekker seems to come out at night in the Ancient Forest only. We’re not sure if it can only be found in the Witcher quest, but we do recall the area turning to night over time so that’s where we’d put our money. Completing the bounty gives you items used to craft a new full armor set and weapon for your Palico.

See also: