Bandai Namco’s Tales franchise has made the move to mobile with an all-star adventure in Tales of Crestoria. You’ll explore vibrant lands and take on all sorts of familiar foes as a brand new hero named Kanata.
He won’t be going on such a grand journey alone, however – joining him are several iconic characters from the Tales franchise, such as Yuri, Lloyd, Luke fon Fabre, etc. Your party of heroes will dish out justice during turn-based battles, get stronger with the use of attachable Memoria Stones, eat different types of dishes to get pre-match stat boosts and handle all sorts of other battle tasks. As their mobile commander, you’ll need to acquire even more allies, create varied party compositions, complete missions, and do so much more. With our tips guide, you’ll have all the know-how needed in order to navigate Tales of Crestoria with little to no issues.
Here are the top five tips, tricks, and cheats you need to know for Tales of Crestoria:
Download Tales of Crestoria from Google Play here.
1. Use Auto-Select to Build Up Your First Full Party Lineup, Then Rely on the Auto-Select Option for Memoria Stones and Sub-Stones for Your Proceeding Party Compositions

BANDAI NAMCO Entertainment Inc.
• Once you’ve completed Tales of Crestoria’s tutorial and collected a few allies, use the Auto-Select option to put together your main battle party. Utilizing that ally selection and all the options that come with it should provide you with the best party members, sub-members and sub-stones you currently have in your collection. Every time you earn a new ally and properly upgrade them with the required items needed to do so, use the Auto-Select option for your main party again to see if they get added to that lineup. They should automatically take someone’s place if they’re deemed strong enough to join your other main cast of powerful allies. Keep in mind that SSR and SR-ranked characters should definitely be a part of your four main party members.
• Now when it comes to putting together additional party lineups, handle the ally selection for each one on your own. This means you’ll want to make sure each main member and sub-member is tied to a different element (if you don’t have enough varied party members to put together a team full of different elemental affiliations, it won’t hurt to have at least two party members with the same element). Use the Auto-Select option to automatically equip Memoria and Sub-Stones to your other parties and you should always get the best lineup every time. If you ever see one of your allies with a matching Memoria Stone equipped to them, use that stone to awaken that character ASAP. And once you head back out to equip a new Memoria Stone to the ally you just awakened, immediately use the Auto-Select option to attach a new one to them.
2. You Should Mainly Upgrade and Rely on Your First Party During Battle, But Be Sure to Use Your Training, Ascending, and Awakening Items on Your Other Allies From Time to Time

BANDAI NAMCO Entertainment Inc.
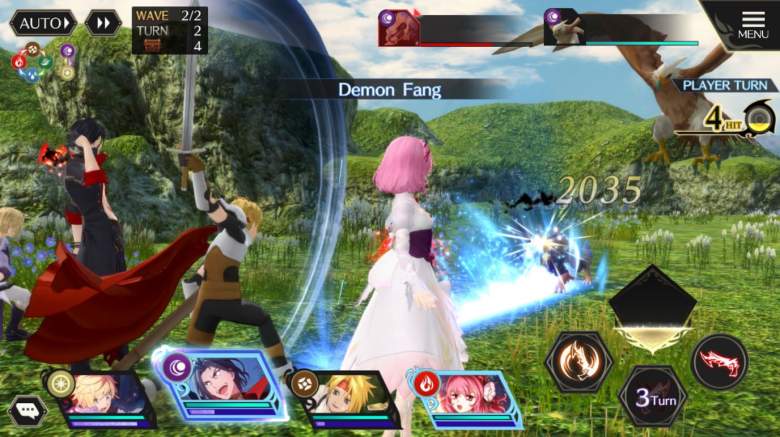
• Your main party should usually be placed front and center during quests, arena battles, and raids. Relying on the auto-battle and fast-forward options during every battle is worth doing since it helps you progress and acquire most of the items needed to strengthen your main party lineup much faster. Your very first party should have no problem dealing with the many challenges they’ll confront if you regularly upgrade them after completing several battles in a row. You’ll usually want to give them a stat boost by feeding them before they take on harder challenges, such as Phantom Tower battles and certain Gald Quests. And make as many friends as you possibly can so you use their strongest allies within your party and earn friendship points (which can be used in the Summons menu) along the way.
• Don’t pour all of your upgrading items into powering up your main party all the time, however. You’ll want to make your other party allies just as strong by using those same items to power them up as well. Sometimes it’s worth building up other party lineups so you can experiment with them during different types of battles to see if they’re worth keeping together. Putting together multiple parties with at least one or two upgraded allies within them is worth doing if you’re looking to try out a different approach to the game’s many battle modes. When it comes to upgrading your Memoria Stones, be sure to refine and ascend the ones that are equipped to your characters.
3. Do Everything You Can to Earn Gleamstones So You Can Take Advantage of the Summon x10 Option on a Daily Basis

BANDAI NAMCO Entertainment Inc.
• Gleamstones are incredibly precious items simply because they allow you to summon new allies and Memoria Stones. There are so many ways in which you can acquire that type of currency – completing missions, earning them as the final gift from your Time Box, getting them as a level-up reward from your Battle Pass, sitting through story cutscene chapters, fulfilling all the sub-goals for a quest, completing Challenge Missions, refining specific Memoria Stones, etc.
• You should complete as many of those aforementioned goals as you can on a daily basis so you can earn enough Gleamstones to take advantage of the Summon x10 option every time. Earning several Memoria Stones and possibly a powerful new character all in one shot should be a final goal you attain every time you play during an extended gameplay session.
4. Make the Most of Your Daily Allotted Chances for Arena Battles and Power-Up Quests

BANDAI NAMCO Entertainment Inc.
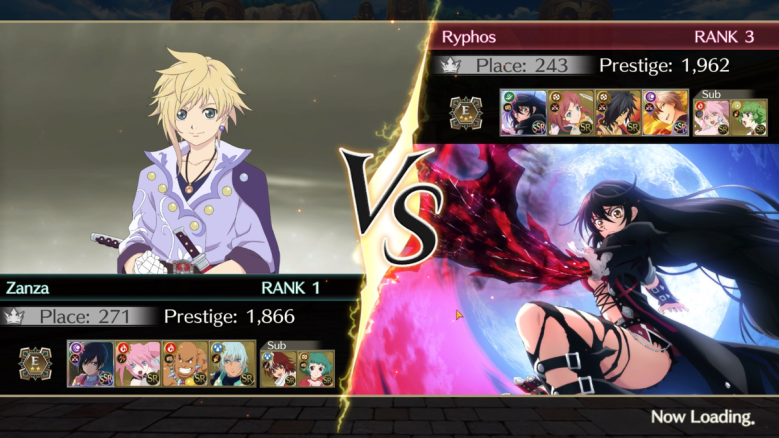
• You’re only provided with five chances to participate in Arena battles before you’re required to wait a long time before those chances are refilled. This means you need to enter the Arena during a new log-in session and use up all of your battle chances. Just turn the Multi-Battle option on to make this process go as quickly as possible so you can reap the benefits of the rewards you gain from your wins. And if you maintain a good winning streak, you should leave the Arena with an increase in your Battle Pass level and earn a new reward for doing so on on a regular basis.
• As for Power-Up Quests, completing these battles helps you acquire the goods that help upgrade your band of merry warriors and unlocked Memoria Stones. The time or attempt limit for these types of quests is strick, so complete them ASAP before you’re unable to participate in them. Once you log-in during a fresh session, head straight to the Power-Up Quests to see if they’re available for you to hop into. You have all the time in the world to play Story Quests, Gald Quests, and Phantom Tower battles, so take care of those Power-Up Quests first before you play the game’s other modes.
5. Throw Yourself Into More Raids That Require Your Aid
• Once you’ve unlocked the Raid battle option, spend some time within it to earn yourself some medals currency and other types of goodies for completing several raids. You’ll need BP (Battle Points) to participate in raids and once they run out, they tend to refill pretty quickly.
• You can use raids as a method towards farming items and medals if you throw yourself into more battles that require your party’s aid. Especially when those aid battles are against enemies that are halfway dead or near death. It may not be honorable, but wiping out creatures that are almost dead still gets you some rewards for your battle participation. It’s worth opening up a raid of your own from time to time, but you’ll amass plenty of rewards and medals much quicker if you complete plenty of aid raids in quick succession.
See Also
Comments
5 Tales of Crestoria Tips & Tricks You Need to Know